What do we think?
Images are usually the reason the for a high percentage of downloaded bytes on a webpages and can also take up a significant amount of page real estate. With this in mind, optimising images can often make some of the biggest byte savings and performance improvements for your website: the fewer bytes the browser has to download, the less the user’s bandwidth is used and the faster the browser can download.
Image optimisation is both an art and science: an art because there is no one definitive answer for how best to compress an individual image, and a science because there are many well developed techniques that can significantly reduce the size of an image. Below is a basic steps to optimising images for use online.
1. Deciding on file type
The best file type for your image to be saved as will depend on what the image is going to be used for, and the detail within the image.
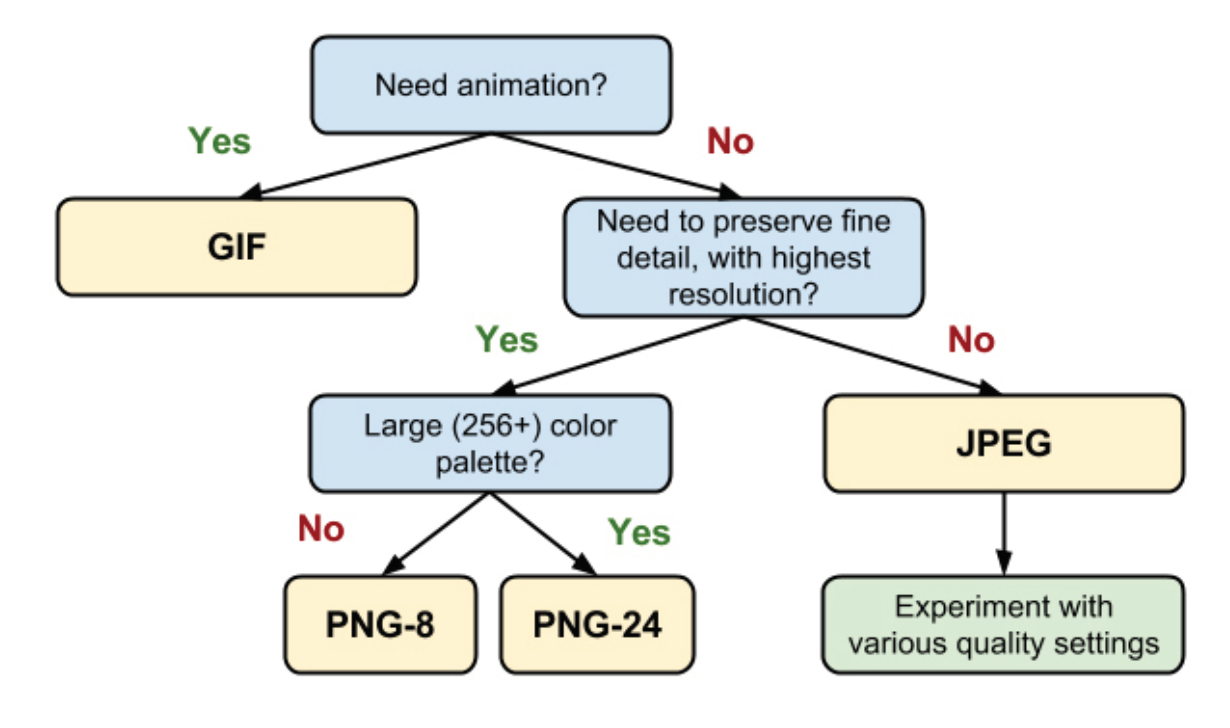
See the flow diagram opposite that will help you decide on the type of file you need.
2. Image size

Once you have decided on the correct file type for your image you need to look at the image size. This is measured in pixels (px). One of the things to be aware of is that sometimes a large image – 1000px X 1000px could be displayed at 25px X 25px. The CSS of the site will be resizing the image to display it smaller. By saving your image at the correct px size you are saving the end user downloading bytes that they don’t need, using bandwidth they don’t have to.
Once you know the px size you require for your image you need to crop your image using image editing software. Adobe photoshop is the best but there are many free online tools that you can use. One of the best I have used is ‘Fotor’. https://www.fotor.com/ This allows you to open your image, crop it to the desired px and then save it.
3. Image weight
Now you have your image at the desired size (px) you are ready to save it as the correct file type. Using Fotor (or your image software of choice) select the option to save the image. At this point you will have to select the desired file type – GIF, PNG or JPEG.
Once the file type is selected it will display an estimated image weight size. This is measured in bytes. Play around with the quality options to get your image to the desired KB size. As previously mentioned there isn’t a recommended exact weight size for all images, it depends on the image use and px size. As a general rule try and keep images below 300kb. It is important to consider the number of images that are going to be on a particular page. If your image is one of 10, then the final image weight for that page will be 10 times your single image weight size.
We connect emotion with design, discover what counts and focus on what matters.
how we work